기본적인 설정은 거의 마쳤지만 한 가지 문제가 있다.
→ 바로, main.js 파일이 아주 크다는 것.
'메인 저장소 전체'와 '추가 모듈'까지 있다.
아직은 간단한 앱이라 문제가 없지만, 코드가 아주 복잡하다.
이보다 더 큰 앱일 경우, 전부 main.js에 넣지 말아야 한다.
routing에서 했던 것처럼 파일을 하나 더 만들어보자.
1/ store.js파일을 만들어 저장소 전체를 따로 아웃소싱하자.
모듈과 저장소를 선택해서 main.js에서 잘라낸 뒤 store.js에 추가하자.
// main.js
import { createApp } from 'vue';
import { createStore } from 'vuex';

import App from './App.vue';

// 저장소 모듈
const counterModule = {
  namespaced: true,
  state() {
    return {
      counter: 0,
    };
  },
  mutations: {
    increment(state) {
      state.counter = state.counter + 2;
    },
    increase(state, payload) {
      state.counter = state.counter + payload.value;
    },
  },
  actions: {
    increment(context) {
      setTimeout(function () {
        context.commit('increment');
      }, 2000);
    },
    increase(context, payload) {
      context.commit('increase', payload);
    },
  },
  getters: {
    testAuth(state, _, rootState, rootGetters) {
      return state.isLoggedIn;
    },
    finalCounter(state) {
      return state.counter * 3;
    },
    normalizedCounter(state) {
      const finalCounter = state.counter * 3;
      if (finalCounter < 0) {
        return 0;
      }
      if (finalCounter > 100) {
        return 100;
      }
      return finalCounter;
    },
  },
};

// 메인 저장소
const store = createStore({
  modules: {
    numbers: counterModule,
  },
  state() {
    return {
      isLoggedIn: false,
    };
  },
  mutations: {
    setAuth(state, payload) {
      console.log('here?', state.counter);
      state.isLoggedIn = payload.isAuth;
    },
  },
  actions: {
    login(context) {
      context.commit('setAuth', { isAuth: true });
    },
    logout(context) {
      context.commit('setAuth', { isAuth: false });
    },
  },
  getters: {
    userIsAuthenticated(state) {
      return state.isLoggedIn;
    },
  },
});

const app = createApp(App);
app.use(store);

app.mount('#app');
▼
// main.js
import { createApp } from 'vue';
import store from './store.js';

import App from './App.vue';

const app = createApp(App);
app.use(store);

app.mount('#app');
// store.js

import { createStore } from 'vuex';

// 지역 모듈
const counterModule = {
  namespaced: true,
  state() {
    return {
      counter: 0,
    };
  },
  mutations: {
    increment(state) {
      state.counter = state.counter + 2;
    },
    increase(state, payload) {
      state.counter = state.counter + payload.value;
    },
  },
  actions: {
    increment(context) {
      setTimeout(function () {
        context.commit('increment');
      }, 2000);
    },
    increase(context, payload) {
      console.log('context', context);
      context.commit('increase', payload);
    },
  },
  getters: {
    testAuth(state, _, rootState, rootGetters) {
      return state.isLoggedIn;
    },
    finalCounter(state) {
      return state.counter * 3;
    },
    normalizedCounter(state) {
      const finalCounter = state.counter * 3;
      if (finalCounter < 0) {
        return 0;
      }
      if (finalCounter > 100) {
        return 100;
      }
      return finalCounter;
    },
  },
};


// 메인 저장소
const store = createStore({
  modules: {
    numbers: counterModule,
  },
  state() {
    return {
      isLoggedIn: false,
    };
  },
  mutations: {
    setAuth(state, payload) {
      console.log('here?', state.counter);
      state.isLoggedIn = payload.isAuth;
    },
  },
  actions: {
    login(context) {
      context.commit('setAuth', { isAuth: true });
    },
    logout(context) {
      context.commit('setAuth', { isAuth: false });
    },
  },
  getters: {
    userIsAuthenticated(state) {
      return state.isLoggedIn;
    },
  },
});

export default store;
그럼 문제없이 잘 작동한다.
이건 시작일 뿐이다.
여전히 store.js의 크기가 크고, 큰 앱에서는 모듈이 더 많아질테니 훨씬 큰 파일이 되는건 시간 문제다.
추가적인 작업이 필요하다.
2/ store이라는 이름의 폴더를 추가하자.
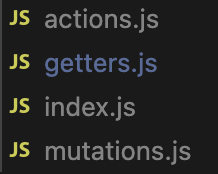
그리고 store 폴더 내에 index.js 파일을 만든 후 메인 저장소 생성로직을 옮기고, actions, mutations, getters를 위해 별개의 파일을 만든다.(actions.js, mutations.js, getters.js)
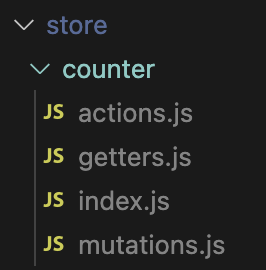
3/ 모든 모듈에 대한 하위 폴더를 만든다.
여기에서는 counter모듈만 있으므로 'couter' 폴더를 만든다.
그리고, counter폴더에 index.js 파일, actions.js파일, mutations.js파일, getters.js 파일을 생성하자.
(원리를 보기위해 각각 따로 만들고 있는데 사실 이번 앱의 경우 굳이 이렇게 할 필요는 없다.)
# 메인 저장소 파일 나누는 법
이제 코드를 파일에 나누는 법을 알아보자.
먼저 메인저장소의 mutation을 보자.
메인 저장소에는 setAuth라는 mutation이 하나 있다. 객체를 잘라내서 mutations.js파일에서 해당 객체를 내보낸다.
// store > mutations.js
export default {
  setAuth(state, payload) {
    state.isLoggedIn = payload.isAuth;
  },
}
분명, 파일에 객체 하나만 가지고 있으므로 과잉작업은 맞다.
index.js 파일에 같이 넣어도 상관없지만 아주 큰 앱일 경우를 고려해서 이런 방법도 알아보는 것.
mutation객체를 export했으면, index.js에서 import 해보자.
rootMutations라는 이름을 붙여 루트 상태에 영향을 미치는 mutation인 것을 표현하는게 좋다.
이제 rootMutations를 mutations에 지정했다.
// index.js
import { createStore } from 'vuex';
import rootMutations from './mutations.js'; //mutation을 import

const store = createStore({
 // 생략
  mutations: rootMutations, //import한 rootMutations 지정
});
actions, getters도 동일한 방식으로 코드를 잘라내서 진행해보자.
index.js에서 state 관련 코드는 그대로 두자.
# 모듈 저장소 파일 나누는 법
이제 모듈을 다룰 차례이다.
store.js에 counterModule이 있다.
store.js를 빈 상태로 만들었으니, 파일을 삭제해도 된다.
코드를 잘라내서 store 폴더의 counter 폴더에서 index.js 파일에 잘라낸 코드를 붙여놓고 객체 전체를 default로 내보내자.
namespaced와 상태 관련 코드는 두자.
// counter > index.js
import counterMutations from './mutations';
import counterActions from './actions.js';
import counterGetters from './getters.js';

export default {
  namespaced: true,
  state() {
    return {
      counter: 0,
    };
  },
  mutations: counterMutations,
  actions: counterActions,
  getters: counterGetters,
};
이렇게 분할을 마치고, counter>index.js에서 모듈을 내보냈으니 store폴더의 index.js에서
'./counter/index.js'로부터 counterModule을 불러올 수 있다.
import { createStore } from 'vuex';
import rootMutations from './mutations.js';
import rootActions from './actions.js';
import rootGetters from './getters.js';
import counterModule from './counter/index.js';

const store = createStore({
  modules: {
    numbers: counterModule,
  },
  state() {
    return {
      isLoggedIn: false,
    };
  },
  mutations: rootMutations,
  actions: rootActions,
  getters: rootGetters,
});

export default store;
counterModule을 numbers에 지정한다.
이제 main.js로 가서 store.js가 아닌 store폴더의 index.js에서 저장소를 불러오자.
import { createApp } from 'vue';
// import store from './store.js';
import store from './store/index.js';

import App from './App.vue';

const app = createApp(App);
app.use(store);

app.mount('#app');
실행하면 전과 같이 작동하지만, 폴더 구조만 바뀌었다.

이건 여러 옵션 중 하나일 뿐이다.
원하는대로 더 바꿔도 된다.
모듈을 여러 개 가지고 있다면 modules 폴더를 추가해 counter 폴더를 modules 폴더 안에 넣고 products 등 다른 모듈 폴더 역시 modules 폴더에 넣어서 모듈을 관리하는 폴더를 따로 만들 수도 있다.
그런 다음 import를 조정해서 './modules/counter/index.js'로부터 counterModule을 불러오면 된다.
** 출처: 모든 내용은 Udemy Vue-완벽가이드 강의를 기반으로 작성하였습니다.
'Vue.js' 카테고리의 다른 글
| [Udemy Vue 완벽가이드 Section15] 230. 요약 (0) | 2023.11.14 |
|---|---|
| [Udemy Vue 완벽가이드 Section15] 226. 도전 과제! (0) | 2023.11.13 |
| [Udemy Vue 완벽가이드 Section15] 224. 네임스페이스 모듈 (2) | 2023.11.08 |
| [Vuex] mapGetters사용 시, 여러 namespace에서 getters가져오는 방법 (0) | 2023.11.08 |
| [Udemy Vue 완벽가이드 Section15] 223. 지역 모듈 상태 이해하기 (0) | 2023.11.07 |


